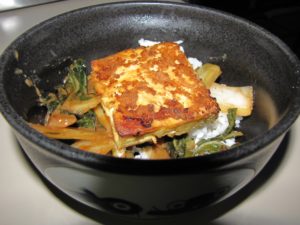
Spicy Peanut Tofu and Bok Choy Rice Bowl
Willy Street Co-op’s monthly publication features many healthy and easy-to-prepare meals in their recipe section. This Spicy Tofu and Bok Choy Rice Bowl makes for a wonderful side dish or as a meal in itself. As always, me made changes according to our palates and what ingredients were available. Enjoy!
Ingredients
1/3 cup soy sauce
1/4 cup rice vinegar
2 tbsp Sriracha sauce
2 tbsp brown sugar
1/4 cup peanut butter, plus 1 tbsp
1/4 tsp salt
1 tbsp sesame oil
16 oz firm tofu, pressed and cut into 8 slices
1 large bunch bok choy, trimmed, roughly chopped
1 garlic clove, minced
4 cups cooked brown rice (we used white)
1/4 cup crushed peanuts
1/4 cup chopped scallions
Directions
Preheat oven to 400 degrees F. Line baking sheet with parchment. In a small bowl, whisk together the soy sauce, rice vinegar, Sriracha, brown sugar, peanut butter and salt until combined. (We left the Sriracha sauce out at this step since we were preparing this for the whole family and my boys can take only so much “heat”. So I added a little bit to my own bowl at the end. Also we halved the amount of brown sugar and omitted the salt since I felt that the soy sauce was salty enough for the dish.) Brush both sides of the slices of tofu with sauce. Some will be left over. Set the tofu on the prepared baking sheet and bake for 35 minutes, flipping halfway through the cooking time.
In a large wok or saute pan, heat the sesame oil over medium heat. Stir in bok choy and garlic. (We halved the amount of sesame oil since a little goes a long way. But we did add a couple more cloves of minced garlic. Yum!) Add the remaining peanut sauce and toss to coat. Saute about 5 minutes, or until greens are wilted and stalks are still crisp.
Scoop about one cup of rice into a bowl. Top with bok choy, two slices of baked tofu, crushed peanuts and scallions. Ready to eat!