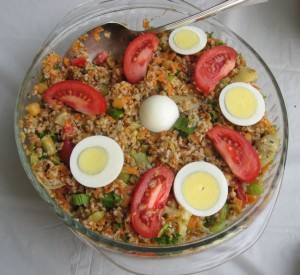
Bulgur Supper Salad

Saturday’s Client Appreciation Day was a big success! To express my thanks for their business and support, I invited clients to my home to enjoy a few homemade dishes, exotic cheeses, local beverages and fantastic weather. The bulgur salad recipe that my friend, Amy, emailed me was a hit. High in fiber & protein and full of flavor, this is a dish you can make for the whole family or bring to your next party. Enjoy!

Bulgar Salad

Ingredients for Salad
2 cups water
3/4 tsp salt
1 cup bulgur
6 oz jar marinated artichoke hearts (save marinade for dressing)
1 large carrot, shredded
2 stalks celery, thinly sliced
2 green onions, thinly sliced
1/2 cup parsley, chopped
1 hard boiled egg, sliced
2 medium tomatoes, sliced
1 cup chickpeas – aka garbanzo beans
1/4 cup green olives

Dressing
4 tbsp salad oil (we used olive oil)
4 tbsp lemon juice
1 tsp dried oregano
1 tsp dried basil
1/2 tsp black pepper
1 garlic clove, pressed or minced
1 tbsp Dijon mustard
marinade from artichoke hearts (approx. 4 tbsp)

Directions
In large pan, bring water and salt to boil. Stir in bulgur. Reduce heat, cover and simmer 15 minutes. Dice artichokes; set aside. To prepare dressing, combine all ingredients. Turn cooked bulgur into a bowl, add dressing and stir gently. Let stand until cool. Stir in artichokes, carrots, celery, olives, chickpeas, onions and parsley. Cover and refrigerate 2 hours or until next day. Garnish with eggs and tomatoes.

Bulgur Supper Salad2014-05-27T08:29:23-05:00

South of the Border Cooking Class

On Wednesday 25th I held my first cooking class at Fresh Madison Market. The 2-hour class was titled Cooking South of the Border, and I prepared some of my favorite Tex-Mex cuisine: Sizzlin’ Chicken Fajitas (in a cast iron skillet just like the restaurants), Heather’s Homemade Guacamole (a real crowd pleaser), Chili con Carne (adapted from my mom’s recipe — it’s great for a large group or put into containers and make your own frozen entrees) and a Crisp Taco Salad (say goodbye to iceberg lettuce). The goal was to create meals that were familiar, simple, delicious and healthy. In addition to sampling each dish, everyone enjoyed a Corona Extra or glass of Sangria. I also covered different cutting techniques like how to peel and dice garlic, how to core and chop bell peppers and how to slice an onion without crying.

What I enjoyed most was that everyone had a good time, asked great questions and were interested in learning more. So what’s next on the list? People who attended my class said they were interested in Thai cuisine. Pad thai, curries, satays. Yum. If you are interested in having me put on a cooking class for you and your friends, please give me a call.

South of the Border Cooking Class
Chopping a green bell pepper and sharing a story.

South of the Border 2
Getting ingredients ready for chili con carne.

South of the Border 3
Plating up some sizzlin’ chicken fajitas.

South of the Border Cooking Class2014-03-28T11:26:37-05:00

The Mystery of Cooking Oils Revealed

IMG_4579

There are so many cooking oils to choose from. In my kitchen, I have olive, canola, peanut, grape seed, walnut and sesame seed oil just to name a few. When do I choose one over the other? That depends on the food I’m preparing, cooking temperatures and if I want the oil to add flavor or be neutral. When I do a stir-fry, for example, food is cooked quickly over very high heat. Peanut is my oil of choice. Why? First of all, the flavor of peanut oil complements most Asian dishes. Second, peanut oil has a high smoke point. What’s that? It’s the point at which the oil begins to smoke and breakdown. If you cook with oil that’s heated past its smoke point, it will impart a burnt flavor to your food. Plus heating your oil too far beyond its smoke point could possibly start a fire. Peanut oil has a smoke point of 450 degrees F. Grape seed oil is a good alternative for stir-frying with a smoke point of 420 degrees F.

When I prepare Mediterranean dishes I often cook with olive oil or extra virgin olive oil. Temperatures are often medium to medium/high. Olive oil has a smoke point of 375-400 degrees F. Corn oil is a great all-purpose oil and my go-to when preparing Latin dishes. Its flavor is a perfect complement to Tex-Mex foods. It also has a high smoke point. Canola oil has a neutral flavor with a smoke point of 400-450 degrees F. It’s great for sauteing or baking. Sesame seed oil is all about imparting flavor. Its wonderful in marinades and has a strong smokey flavor. So use sparingly. I like to drizzle a little bit on Asian foods at the end of cooking.

Okay I’ve talked about cooking oils based on cooking temperatures, flavors and smoke points. What about nutritional information and health benefits? A few years ago, there was much discussion of saturated fats, trans fats, polyunsaturated fats and monounsaturated fats. The verdict? Saturated and trans fats are not good for you and are known as “bad” fats. Poly and monounsaturated fats are the “good” ones. All of the oils I listed above have 120 calories per 1 tablespoon serving. They vary primarily in the amounts of good fats. Canola oil has 9 grams of monounsaturated fat and 4 grams of polyunsaturated while grapeseed oil has 2 grams of monounsaturated fat and 10 grams of polyunsaturated. Peanut oil has relatively equal amounts of mono and polyunsaturated fats. Now before you run to your kitchen cupboard and start comparing oils, remember that most dishes use very little oil, sometimes 1 or 2 tablespoons in an entire pot or large skillet. If your meal yields 10 servings, that’s just a wee bit of oil per person.

Cook for fun and cook for health. Let me know what’s on your menu and I’d be happy to share it with everyone.

The Mystery of Cooking Oils Revealed2014-03-16T11:49:59-05:00

Chicken Enchilada Soup

After my son, Roy, was born last March, our friend, Natalie, brought over a homemade dinner. Heather and I had prepared and frozen several meals ahead of time, but I can’t tell you how much we appreciated the extra help from our friends. The chicken enchilada soup was delicious, flavorful and hearty . . . perfect for a Wisconsin winter. Since then we have made it at least once a month. It’s so easy. Prep time is less than 15 minutes. Then you just pop the ingredients in the crock pot, turn it on and you’re good-to-go. Thanks again, Natalie!

Chicken Enchilada Soup

Ingredients
2 lbs boneless, skinless chicken breast and thigh meat
1 28oz can organic diced tomatoes, undrained
2 15oz cans “Kuners” already spiced black beans (chili powder and cumin), undrained
1 4oz can green chiles
1 12oz can “mild” enchilada sauce
1 large red bell pepper cut into chunks
4 medium zucchini cut into 1″ pieces

Directions
Place meat into a 4-6 quart crock pot. Cover with tomatoes, black beans, chiles, bell pepper and enchilada sauce. Cook on “low” for 8 hours or “high” for 4 hours. Add the zucchini on top with one hour left of cooking. That will keep them from getting too mushy. When soup is cooked, shred chicken with a fork before serving.

Serve with grated cheese, yogurt, sour cream, avocado slices or fresh cilantro.

Chicken Enchilada Soup2014-02-04T11:15:38-06:00

Vegetarian Split Pea Soup

I think about my mom when I cook . . . which is every day. Sometimes I’ll pick up the phone to ask her what she’s preparing for dinner or get some recipe ideas. More than once, we’ve both made split pea soup on the same day. Like mother, like son. Split peas are inexpensive and easy to prepare. Also they are high in fiber, protein, potassium, magnesium and iron. So here’s is Mom’s recipe. Enjoy!

Vegetarian Split Pea Soup

Ingredients
1 cup green split peas, sorted and rinsed
1 cup yellow split peas, sorted and rinsed
1 1/2 cups carrots, peeled and chopped
1 cup celery, chopped
1 medium yellow onion, diced
3-4 cloves garlic, diced
8 cups water
1 tbsp vegetable base or stock
2 tbsp curry powder
1/2 teaspoon cayenne pepper
salt and pepper to taste
2 tbsp olive oil
1 bay leaf

Directions
Start by sorting the split peas, and compost any “bad” ones you find. Next rinse the “good” split peas with water to clean off any dirt. Split peas don’t have the same gas-producing sugars like some other beans, so you don’t have to pre-soak them.

Heat a large pot over medium heat. Then add olive oil, chopped onions, carrots, celery and garlic. Cook for 5-10 minutes, stirring occasionally until vegetables are tender. Add the green and yellow split peas. Cover with 8 cups water. Add vegetable base then raise heat to high. Bring to boil. Lower heat to simmer and stir in the the curry powder, cayenne pepper, bay leaf and salt and pepper to taste. Cover and let cook for 90 minutes.

Serve as a main dish or with a meal.

Note: There’s no need to puree or smash the peas as they will naturally break down during the cooking process.

Vegetarian Split Pea Soup2014-01-14T08:43:34-06:00

Giving Thanks

This Thursday most of us will be spending time with family, eating, drinking, watching football and being merry. Let’s not forget what Thanksgiving Day is all about . . . giving thanks.

I want to start by thanking you for reading my blog, giving me feedback and sharing the posts. I’ve never been one to blog as a personal diary, make it a forum to vent or to share opinions not related to health and fitness. It is my ongoing goal to help you get in the best shape of your life by sharing easy-to-prepare recipes, safe and effective exercises, new fitness equipment, informative books and articles, and timeless tips and strategies.

I also want to thank my nutritional supplement customers. By buying Nutrilite products you are supporting organic farms and sustainable farming practices. When we’ve sat down face-to-face, spoken over the phone, or just emailed each other I assure you that I have your best interests at heart. Since I don’t inventory products, I can suggest supplements that make sense for you versus what’s sitting in the back room gathering dust.

Lastly, I want to thank my personal training clients. Even if you just trained with me for a week or we’ve been together for years, without you there would be no Balance Personal Training. As my saying goes, “Fun, safety and results. That’s what personal training with Eric Foxman is all about.” After 18 years of working professionally in the health and fitness industry, I can’t imagine not training. It’s how I live my life. It’s how I move through the world. Thanks for giving me the opportunity to help guide you, teach you and go along the journey with you. Now please pass the cranberry sauce.

Grandma Becky and Bruce make Cranberry-Orange relish
Grandma Becky and Bruce make cranberry-orange relish.

Giving Thanks2013-11-25T08:54:12-06:00

How To Make Homemade Baby Food with Butternut Squash

Our 7 month-old, Roy, was recently introduced to solid foods. We started with organic rice cereal, moved on to whole-grain cereal, then started adding foods like pureed vegetables, fruits and yogurt. Now we simply put what we had for dinner (ie: minestrone soup) in the food processor. As my grandfather would say, “He eats with gusto.” Roy’s two favorites are peas and butternut squash. It’s a good thing that Heather had a plentiful harvest of squash from her veggie garden. Not only is this winter vegetable delicious, it is low calorie and contains no cholesterol or saturated fats. Plus it is high in Vitamin A and Vitamin C (two powerful anti-oxidants), B-complex groups and potassium. Let’s not forget to roast up those seeds. They are a good source of protein, mono-unsaturated fats and fiber.

Ingredients
1 4lb butternut squash
Butternut Squash
Directions
Preheat oven to 350°F. Using a sharp knife, slice squash in half.
Halved squash
Remove seeds (save for roasting) and some of the stringy flesh. Place slices in shallow roasting pan, flesh-side down, with about 1/4 inch water in bottom of pan.
Butternut squash is pan
Roast for approximately 45-60 minutes or until you can easily insert a fork right into the rind of the squash.

Remove squash from oven and let cool for 10-15 minutes. Using a spoon, scoop out flesh from shells and place in food processor or immersion blender. Add water based on desired consistency. Of course, you can also manually blend the squash in a bowl with a spoon or fork. Discard (compost) squash shells.
Butternut squash in blender

Bruce's pureed butternut squash
Total yield from one squash is 15-20 4-ounce jars. A 4-ounce jar of 2nd foods organic baby food will run you between $1 and $1.50 a jar. That’s a savings of $15-$30! All that came from a seed planted in the ground. Remember that each butternut squash plant yields several large squash. If you’d rather buy a 3-4 lb organic butternut squash, that will cost $4-5. . . and you’re still saving a lot of money. Another benefit to making your own baby food is the reduction of waste. No more glass jars, plastic containers or “convenient” pouches.
Feeding Roy butternut squash

Satisfied customer
A satisfied customer.

How To Make Homemade Baby Food with Butternut Squash2013-11-04T09:50:47-06:00

Sizzling Chicken Fajitas

It’s been a great year for growing peppers, onions, tomatoes, garlic and cilantro. Add some chicken and spices and we’ve got a great fajitas recipe. Enjoy!

Chicken Fajitas Ingredients

Ingredients
1 lb boneless chicken thighs or breasts, sliced
1 medium red onion, sliced
1 medium yellow onion, sliced
2 red peppers and 2 green peppers, sliced (these aren’t spicy but have more of bite to them than your sweeter bell peppers)
2 tomatoes, chopped
2 medium limes (one for the juice and the other to go into a nice Corona)
3 tbsp canola oil
2-3 cloves garlic, diced
1 tbsp ground cumin
1 tsp ground coriander
1 tsp chili powder (use more or less depending on how much kick you want)
1/2 cup fresh cilantro, chopped
salt and pepper to taste
corn or flour tortillas
1 avocado, diced (optional)
Greek yogurt (optional)

Directions
To a bowl, add lime juice, canola oil, garlic, cumin, coriander, chili powder, cilantro, salt and pepper. Whisk to combine. Place chicken in a bowl or dish. Pour marinade over chicken and coat thoroughly. Cover and refrigerate from a few hours to over night.

Heat pan (or cast-iron skillet if you have one) to medium high. Add chicken pieces and cook until well-browned (10-15 minutes). Remove chicken from skillet and set aside. Add peppers, onions and tomatoes. Cook until slightly charred.

Serve plain or with your favorite tortillas. We also diced some avocado and added a spoonful of Greek yogurt on the side.

Sizzling Chicken Fajitas

Sizzling Chicken Fajitas2013-10-07T11:26:26-05:00

Heather’s Dill Pickle Recipe

Heather's Dill Pickles close up

It’s cucumber harvesting time in Heather’s garden. They’re cool and refreshing on a hot summer’s day. We like to slice them up and put them in sandwiches, on salads and in pitchers of water. Best of all, we like to make dill pickles. Over the years, Heather has modified a recipe from Better Homes and Gardens New Cookbook. Enjoy!

Directions
Scrub 3-or-4-inch cucumbers with brush. (We used 9 lbs which yields approximately 9 quart jars.) Pack loosely in hot quart jars. To each quart add: 2 heads fresh dill, 1 teaspoon mustard seed and 1/2 teaspoon sliced garlic. Make brine by combining 1 cup vinegar, 2 cups water, and 1 tablespoon granulated pickling salt for each quart; bring to boil. Fill hot jars to within 1/2 inch of top with brine. Adjust lids. Process in boiling water bath for 20 minutes (start timing as soon as jars are placed in water).
*Note. Please consult a reputable canning/jarring protocol for canning details.

Heather's Dill Pcikles
Batch #1

Heather’s Dill Pickle Recipe2013-08-30T09:28:36-05:00

What to do with Wild Blackberries

It was around this time last year (July 12th, 2012 to be exact) that I shared my wife’s Blackberry Freezer Jam Recipe. Well Heather’s at it again. Braving clouds of biting mosquitoes and vines with sharp prickles she filled a pail full of wild blackberries from our backyard. At about $9 a pound for organic blackberries, Heather said it was well worth it.

Now, what to do with them? Blackberries are great in smoothies, on top of my Hi Protein Pancakes or eaten plain. This time we tried a blackberry cobbler. Wait a minute, Eric. That’s a dessert. True. And how do I always respond when asked if something is good or bad, healthy or unhealthy? It depends. In this case, it’s about the ingredients and how you prepare them.

Fruit cobblers, crumbles and crisps have less fat and sugar than your typical pie crusts. And remember most of the sweetness and sugar comes from the fruit. We like our blackberry cobbler a little on the tart side so we didn’t add as much sugar. Use the recipe below more as a guideline than strict directions. You may want to add more berries, vanilla or crushed almonds. It’s up to you. Enjoy!

Ingredients
5 cups fresh blackberries
2 tablespoons granulated sugar
1/4 cup brown sugar
1/4 cup cold butter
1 cup quick-cooking oats
3/4 cup all-purpose flour
1 tablespoon cornstarch
1 tablespoon fresh lemon juice
2 tablespoons water
1 teaspoon ground cinnamon

Directions
Place blackberries in a greased baking dish. In a small bowl, combine the granulated sugar, cornstarch, water and lemon juice until smooth. Pour over berries. Combine the oats, flour, brown sugar and cinnamon. Cut butter into small pieces and add to dry mixture until crumbly. Sprinkle over berries. Bake, uncovered, at 375° for 20-25 minutes or until bubbling.

What to do with Wild Blackberries2013-07-16T11:28:27-05:00
Go to Top